CompTIA XK0-006 Practice Test 2026
Updated On : 8-Jul-2026Prepare smarter and boost your chances of success with our CompTIA XK0-006 practice test 2026. These CompTIA Linux+ V8 test questions helps you assess your knowledge, pinpoint strengths, and target areas for improvement. Surveys and user data from multiple platforms show that individuals who use XK0-006 practice exam are 40–50% more likely to pass on their first attempt.
Start practicing today and take the fast track to becoming CompTIA XK0-006 certified.
11500 already prepared
150 Questions
CompTIA Linux+ V8
4.8/5.0

Troubleshooting
A systems administrator is having issues with a third-party API endpoint. The administrator receives the
following output:
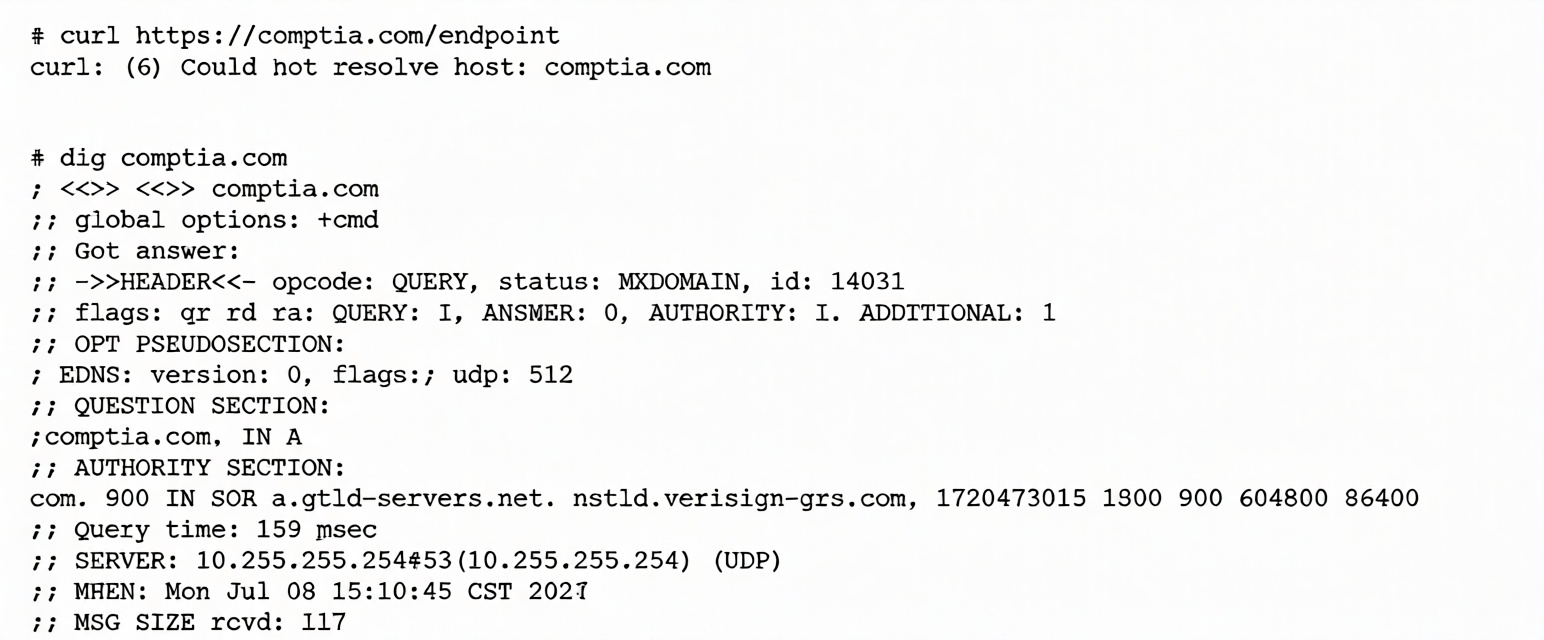
Which of the following actions should the administrator take to resolve the issue?
A. Open a secure port in the server's firewall.
B. Request a new API endpoint from a third party.
C. Review and fix the DNS client configuration file.
D. Enable internet connectivity on the host.
Explanation:
The provided command outputs indicate a failure in the Domain Name System (DNS) resolution process, which prevents the system from finding the IP address of the third-party API.
curl Analysis:
The output
curl: (6) Could not resolve host: comptia.com
shows that the application cannot proceed because it doesn't know where to send the data.
dig Analysis:
Status: NXDOMAIN — "Non-Existent Domain." The DNS server explicitly states it cannot find a record for the requested name.
ANSWER: 0 → No valid IP address was returned for the query.
Server Information: The system is querying an internal IP address, 10.255.255.254. This local nameserver is failing to provide public internet records.
The Action:
The DNS client configuration file in Linux is typically /etc/resolv.conf.
Reviewing and fixing this file — by adding a valid nameserver such as 8.8.8.8 — will allow the system to correctly resolve the API endpoint.
Explanation of Incorrect Answers
Open a secure port in the server's firewall:
Firewall issues usually result in "Connection Timed Out" or "Connection Refused" errors.
Because the error here is "Could not resolve host," the system hasn't even reached the stage where a firewall would block a port. It cannot connect without an IP address.
Request a new API endpoint from a third party:
The dig output shows the system is querying comptia.com, which is a valid domain.
The endpoint itself is likely fine. The problem lies with the local server's inability to resolve the domain.
Enable internet connectivity on the host:
The system is successfully communicating with its local DNS server at 10.255.255.254 (as evidenced by the dig response).
While general internet access might be required for the API call, the specific error here is DNS resolution, which must be fixed in /etc/resolv.conf first.
Reference:
CompTIA Exam Objective: Domain 5.0 (Troubleshooting) – Subsection 5.3: Analyze and troubleshoot network-related issues (DNS and Name Resolution).
Reference: Linux Man Pages (man resolv.conf, man dig); Official CompTIA Linux+ Study Guide, Chapter on Network Troubleshooting.
A Linux administrator just finished setting up passwordless SSH authentication between two nodes. However,
upon test validation, the remote host prompts for a password. Given the following logs:
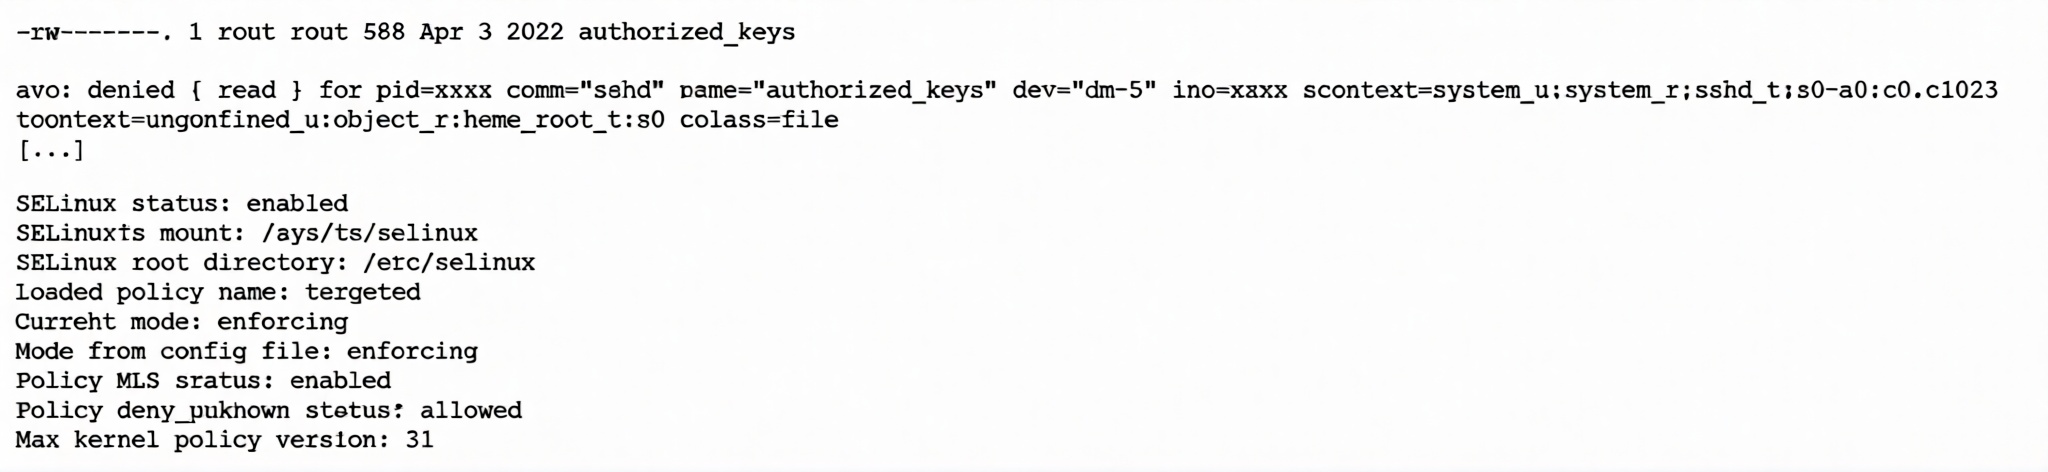
Which of the following is the most likely cause of the issue?
A. The SELinux policy is incorrectly targeting the unconf ined_u context.
B. The administrator forgot to restart the SSHD after creating the authorizedjceys file.
C. The authorized_keys file has the incorrect root permissions assigned.
D. The authorized_keys file does not have the correct security context to match SELinux policy.
Explanation:
Why this is the most likely cause
The log shows an SELinux AVC denial:
- comm="sshd" and scontext=system_u:system_r:sshd_t:... → the sshd process is trying to read the key file.
- name="authorized_keys" → the file sshd is trying to read.
- tcontext=unconfined_u:object_r:home_root_t:s0 → the target file is labeled home_root_t, which is not the expected SELinux type for SSH authorized keys.
The system is in enforcing mode, so SELinux will block the read.
So even if the file permissions are correct, sshd can’t read it because SELinux denies access based on the file label/type → SSH key auth fails and it falls back to password prompting.
Why the other options are not best
- Incorrectly targeting the unconfined_u context: unconfined_u here is the SELinux user part of the label; the critical mismatch is the type (home_root_t), not “targeting unconfined_u.”
- Forgot to restart sshd: sshd does not require a restart to read authorized_keys—it reads it on login attempts.
- Incorrect root permissions: The file shows -rw------- owned by root:root, which is typically acceptable; the denial is explicitly from SELinux, not UNIX permissions.
Typical fix (what an admin would do)
Restore the proper SELinux context, e.g.:
restorecon -Rv /root/.ssh
(or wherever the authorized_keys file lives), ensuring it gets the expected SSH-related SELinux type (commonly ssh_home_t on SELinux systems).
A Linux administrator receives reports that an application hosted in a system is not completing tasks in the
allocated time. The administrator connects to the system and obtains the following details:
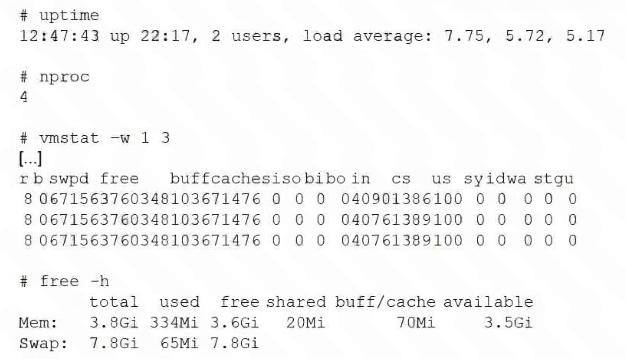
Which of the following actions can the administrator take to help speed up the jobs?
A. Increase the amount of free memory available to the system.
B. Increase the amount of CPU resources available to the system.
C. Increase the amount of swap space available to the system.
D. Increase the amount of disks available to the system.
Explanation:
The system is experiencing a CPU bottleneck, which is preventing the application from completing tasks on time. We can determine this by looking at three key metrics in the output:
Load Average vs. Core Count:
The uptime command shows a 1-minute load average of 7.75. However, the nproc command shows the system only has 4 CPU cores. In Linux, a load average significantly higher than the number of cores (7.75 > 4) indicates that processes are queuing and waiting for CPU time.
Process Queue (vmstat):
Looking at the vmstat -w 1 3 output, the 'r' column (runnable processes) shows a value of 8. This means there are 8 processes either running or waiting for a CPU cycle. With only 4 cores, at least 4 processes are constantly stalled in the queue.
CPU Utilization (vmstat):
The us (user) column is at 100, and id (idle) is at 0. This confirms the CPUs are fully saturated by user-space applications with zero idle time available.
Increasing CPU resources (adding more vCPUs or upgrading the processor) is the only way to resolve a queue of 8 processes competing for 4 cores.
Explanation of Incorrect Answers
Increase the amount of free memory available to the system:
The free -h output shows that the system has 3.5Gi available out of 3.8Gi total. The system is barely using RAM (only 334Mi used). Adding more memory will not help because the current memory is not being fully utilized.
Increase the amount of swap space available to the system:
The free -h output shows that swap usage is negligible (65Mi used out of 7.8Gi). Furthermore, the vmstat output shows 0 in the si (swap in) and so (swap out) columns, proving there is no memory pressure or swapping activity causing the slowdown.
Increase the amount of disks available to the system:
In the vmstat output, the bi (blocks in) and bo (blocks out) columns are 0, and the wa (I/O wait) column is also 0. This indicates that the system is not waiting on disk operations; the bottleneck is purely CPU-related.
Reference
CompTIA Exam Objective: Domain 5.0 (Troubleshooting) – Subsection 5.2: "Troubleshoot system-related issues" (focusing on CPU, memory, and I/O performance monitoring).
Reference: The Linux Command Line (William Shotts), Chapter 10: Processes; and Official CompTIA Linux+ Study Guide, Chapter on Performance Monitoring and Tuning.
| Page 1 out of 15 Pages |
CompTIA Linux+ V8 Practice Questions
CompTIA Linux+ XK0-006 Official Exam Blueprints And Our Practice Questions
| CompTIA Linux+ XK0-006 Domain | Official Exam Weight | Our Practice Questions |
|---|---|---|
| System Management | 23% | 48 |
| Our Practice Questions Covers Subtopics: Linux boot process, Kernel management, Device management, Storage management, LVM and RAID, Filesystems, Network configuration, Shell operations, Backup and restore, Virtualization, KVM and QEMU, System monitoring, Package management, Network tools, Environment variables, Shell utilities | ||
| Services and User Management | 20% | 11 |
| Our Practice Questions Covers Subtopics: User management, Group management, File permissions, Account administration, Systemd services, Service management, Process management, Job scheduling, Containers, Docker basics, File and directory operations, Linux services, Package repositories, Access controls | ||
| Security | 18% | 31 |
| Our Practice Questions Covers Subtopics: Authentication and authorization, PAM, LDAP, Kerberos, Firewall configuration, SELinux, OS hardening, Account security, Cryptography, Certificates, File integrity, Security auditing, Compliance, Security scans, SSH security, Least privilege | ||
| Automation, Orchestration, and Scripting | 17% | 29 |
| Our Practice Questions Covers Subtopics: Bash scripting, Python scripting, Automation tools, Ansible, Puppet, CI/CD concepts, Git version control, YAML and JSON, Shell scripting, Variables and loops, Conditional logic, Functions, Orchestration, Infrastructure automation, AI-assisted scripting | ||
| Troubleshooting | 22% | 31 |
| Our Practice Questions Covers Subtopics: System troubleshooting, Boot issues, Service failures, Network troubleshooting, DNS issues, Firewall troubleshooting, Performance analysis, CPU and memory issues, Disk latency, Connectivity problems, Log analysis, Filesystem repair, Permission issues, Security troubleshooting, Diagnostic utilities | ||
Struggling with Linux commands, shell scripts, and system administration? This practice test mirrors the actual XK0-006 exams focus on hardware configuration, file management, security, and automation. You will work through questions on boot processes, network configuration, user permissions, and troubleshooting real-world Linux issues. Each answer includes detailed explanations that clarify why certain commands work in specific scenarios. By identifying gaps in your command-line knowledge before exam day, You will walk in confident. Stop guessing which Linux topics need attention—let this test reveal exactly what to study and master.
What Our Community Says
Linux+ covers distribution-neutral concepts that can be tricky to master. Preptia XK0-006 practice test questions helped me understand command-line operations, scripting, and security across different Linux environments. The questions were accurate and prepared me perfectly for exam day.
Robert Hayes, Linux Administrator | Seattle, WA
Linux administration preparation improved greatly with Preptia.com practice exams for Linux+ (XK0-006). The questions covered scripting, system management, and security tasks in a practical and exam-focused way.
Rafael Costa | Brazil