Think You're Ready?

Your Final Exam Before the Final Exam.
Dare to Take It?

Troubleshooting

An administrator attempts to install updates on a Linux system but receives error messages regarding a specific repository. Which of the following commands should the administrator use to verify that the repository is installed and enabled?

A. yum repo-pkgs

B. yum list installed repos

C. yum reposync available

D. yum repolist all

D.   yum repolist all

Explanation:

The yum repolist command is used to display information about configured repositories. Adding the all flag ensures that the command shows every repository defined in the /etc/yum.repos.d/ directory, along with their current status (enabled or disabled). This allows an administrator to quickly identify if a repository causing errors is actually active or if it needs to be toggled on.

❌ Why other options are incorrect
yum repo-pkgs:
This command is used to list or work with packages contained within a specific repository. It is used after you know which repository you want to target, not for verifying the overall status of the repositories themselves.
yum list installed repos:
This is syntactically incorrect. While yum list installed shows installed software packages, it does not provide a list of configured repository sources.
yum reposync available:
reposync is a specific utility used to synchronize (mirror) a remote repository to a local directory. It is not the standard tool for verifying basic repository status on a live system.

An administrator receives reports that a web service is not responding. The administrator reviews the following outputs:


Which of the following is the reason the web service is not responding?

A. The private key needs to be renamed from server.crt to server, key so the service can find it.

B. The private key does not match the public key, and both keys should be replaced.

C. The private key is not in the correct location and needs to be moved to the correct directory.

D. The private key has the incorrect permissions and should be changed to 0755 for the service.

C.   The private key is not in the correct location and needs to be moved to the correct directory.

Explanation:

The key error in the logs is:
textnginx: [emerg] cannot load certificate key "/etc/pki/nginx/private/server.key": BIO_new_file() failed (SSL: error:80000002:system library::No such file or directory:calling:fopen('/etc/pki/nginx/private/server.key','r') error:10000080:BIO routines::no such file)
Even though ls -lRt clearly shows the file exists:
text-rw------- 1 root root 227 Jul 10 10:56 server.key
Nginx is reporting it as "No such file or directory" when trying to open it via OpenSSL's BIO_new_file().
This is a classic symptom of permission denied being translated into a misleading "No such file or directory" error by OpenSSL/Nginx.

The file has permissions -rw------- (0600) → readable/writable only by root.
Nginx usually runs as user nginx (or www-data on Debian/Ubuntu), not as root.
Therefore, the nginx process cannot read the private key file → OpenSSL fails to open it → reports "no such file" (a known quirk in older OpenSSL error handling; newer versions often say "Permission denied" more clearly, but the behavior matches many documented cases).

Why the other options are incorrect
The private key needs to be renamed from server.crt to server.key → No, the file is already named server.key, and the config is pointing to it correctly (the error is about reading it, not the name).
The private key does not match the public key, and both keys should be replaced → No, the error occurs before any matching/validation; Nginx can't even load the key file to begin with.
The private key is not in the correct location and needs to be moved → No, ls confirms it's exactly where the config expects: /etc/pki/nginx/private/server.key.

Correct fix (what the admin should do)
Change the permissions so the nginx user can read the key (common secure practice):

sudo chmod 640 /etc/pki/nginx/private/server.key
sudo chown root:nginx /etc/pki/nginx/private/server.key    # or root:www-data depending on distro
640 = owner (root) rw, group r, others none
Group = nginx (or the group nginx runs under)

Then test and restart:
sudo nginx -t
sudo systemctl restart nginx
This resolves the startup failure and allows the web service (Nginx) to respond again.
This is a very common real-world and exam-style troubleshooting scenario for Nginx + SSL in CompTIA Linux+ (XK0-006), especially under security/hardening and service management objectives.

An administrator needs to remove the directory /home/user1/data and all of its contents. Which of the following commands should the administrator use?

A. rmdir -p /home/user1/data

B. ln -d /home/user1/data

C. rm -r /home/user1/data

D. cut -d /home/user1/data

C.   rm -r /home/user1/data

Explanation:

The rm (remove) command is the primary utility for deleting files and directories in Linux.
-r (Recursive): This flag is essential when dealing with directories. It instructs the command to descend into the specified directory and remove all files, subdirectories, and the target directory itself.
Effectiveness: Without the -r (or -R) flag, rm will fail when targeting a directory, reporting that it cannot remove a directory.
Safety Note: Administrators often use -rf (recursive and force) to bypass confirmation prompts, though this should be used with extreme caution.

Explanation of Incorrect Answers
rmdir -p /home/user1/data: The rmdir command is designed to remove empty directories only. The -p (parents) flag allows for the removal of a directory and its ancestors if they are also empty. If /home/user1/data contains any files or subdirectories, this command will fail with an "Directory not empty" error.

ln -d /home/user1/data: The ln command is used to create links between files. The -d flag is a restricted option that allows the superuser to attempt to make a hard link to a directory, which is generally not permitted on most modern Linux filesystems to prevent loops. It does not delete data.

cut -d /home/user1/data: The cut command is a text processing utility used to extract sections (columns) from lines of files. The -d flag specifies a delimiter for parsing text. It has no capability to delete files or directories.

Reference
CompTIA Exam Objective: Domain 1.0 (System Management) – Subsection 1.1: "Summarize and utilize Linux command line tools" (specifically File and Directory Management).
Reference: Linux Man Pages (man rm, man rmdir); Official CompTIA Linux+ Study Guide, Chapter on File and Directory Management.

A Linux administrator attempts to log in to a server over SSH as root and receives the following error message: Permission denied, please try again. The administrator is able to log in to the console of the server directly with root and confirms the password is correct. The administrator reviews the configuration of the SSH service and gets the following output:


Based on the above output, which of the following will most likely allow the administrator to log in over SSH to the server?

A. Log out other user sessions because only one is allowed at a time.

B. Enable PAM and configure the SSH module.

C. Modify the SSH port to use 2222.

D. Use a key to log in as root over SSH.

D.   Use a key to log in as root over SSH.

Explanation:

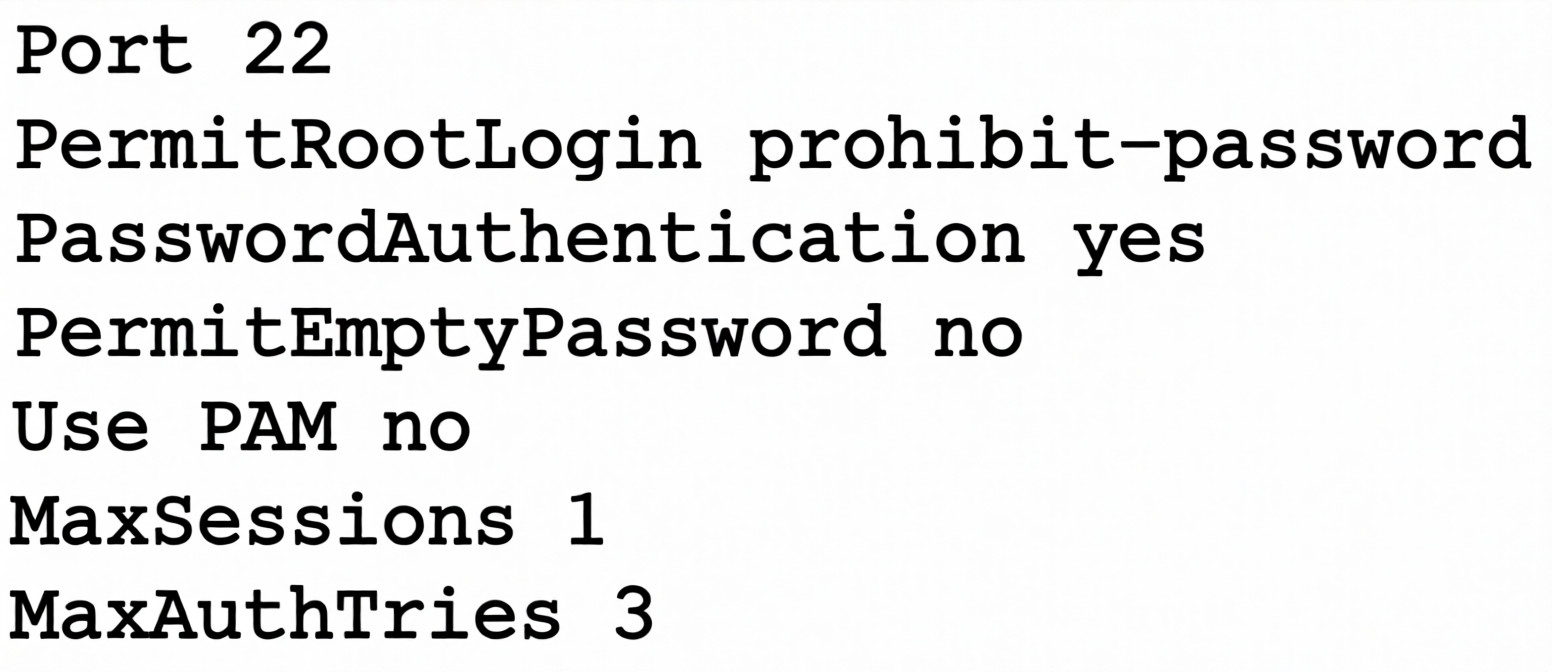
The SSH configuration shows PermitRootLogin prohibit-password, which specifically disables password authentication for root while allowing key-based authentication. This explains why the administrator can log in at the console (which doesn't use SSH) but gets "Permission denied" when trying to log in over SSH with a password.

Analysis of the SSH configuration:
Port 22 # Standard SSH port - not the issue
PermitRootLogin prohibit-password # ⚠️ KEY ISSUE: Root can ONLY log in with keys
PasswordAuthentication yes # Password auth allowed for regular users
PermitEmptyPassword no # Empty passwords not allowed (sensible)
Use PAM no # PAM disabled (but not the root cause)
MaxSessions 1 # Only one session per connection
MaxAuthTries 3 # 3 authentication attempts before disconnect

What prohibit-password means:
Root cannot authenticate with a password over SSH
Root can authenticate with SSH keys (public/private key pairs)
Regular users can still use passwords (since PasswordAuthentication yes)
This is a security best practice to prevent brute-force attacks on the root account

Why other options are incorrect:
❌ Log out other user sessions because only one is allowed at a time.
MaxSessions 1 limits sessions per connection, not total concurrent logins
This would affect multiple simultaneous connections from the same client
The error is "Permission denied" (authentication failure), not "Too many sessions"
Not related to the authentication failure

❌ Enable PAM and configure the SSH module.
Use PAM no means PAM (Pluggable Authentication Modules) is disabled
While this could affect authentication, it's not the primary issue
The key problem is PermitRootLogin prohibit-password
Even with PAM enabled, root password login would still be prohibited

❌ Modify the SSH port to use 2222.
Port 22 is the standard SSH port and is correctly configured
Changing the port wouldn't fix authentication issues
The administrator can connect (gets to password prompt), so port is reachable
Port change is for security through obscurity, not for fixing authentication

Solution: Set up key-based authentication for root
On the client (as root or with sudo):
# Generate SSH key pair (if you don't have one)
ssh-keygen -t rsa -b 4096 -f ~/.ssh/id_rsa_root

# Copy public key to server
ssh-copy-id -i ~/.ssh/id_rsa_root.pub root@server
# or manually:
cat ~/.ssh/id_rsa_root.pub | ssh root@server "mkdir -p ~/.ssh && cat >> ~/.ssh/authorized_keys"

# Set correct permissions on server
chmod 700 /root/.ssh
chmod 600 /root/.ssh/authorized_keys
Then log in with:
ssh -i ~/.ssh/id_rsa_root root@server

Alternative: Change SSH configuration (less secure)
If key-based authentication isn't feasible, the administrator could modify the SSH config:
# Edit /etc/ssh/sshd_config
PermitRootLogin yes # Allow root login with password (less secure)
# OR
PermitRootLogin without-password # Same as prohibit-password (keys only)
# Then restart SSH
systemctl restart sshd
But this is NOT recommended as it weakens security.

SSH PermitRootLogin Options:
Option Password Auth Key Auth Security Level
yes ✅ ✅ Low
prohibit-password ❌ ✅ High
without-password ❌ ✅ High (same as above)
forced-commands-only ❌ ✅ (with command restriction) Very High
no ❌ ❌ Maximum (root can't SSH at all)

Security Best Practices:
Never allow root password authentication over SSH
Use PermitRootLogin prohibit-password or better, PermitRootLogin no and use sudo
Always use key-based authentication for administrative access
Consider disabling root SSH entirely and using a regular user with sudo

Reference:
OpenSSH configuration file: /etc/ssh/sshd_config
PermitRootLogin controls whether root can log in via SSH
prohibit-password is the modern equivalent of without-password
After changing SSH config, always restart the service: systemctl restart sshd
Always test SSH configuration before disconnecting: sshd -t

Users report that a Linux system is unresponsive and simple commands take too long to complete. The Linux administrator logs in to the system and sees the following: Output 1:
10:06:29 up 235 day, 19:23, 2 users, load average: 8.71, 8.24, 7.71


Which of the following is the system experiencing?

A. High latency

B. High uptime

C. High CPU load

D. High I/O wait times

C.   High CPU load

Explanation:

The system's unresponsiveness is directly correlated to the extremely high load averages and CPU utilization percentages shown in the outputs.

Load Average Analysis:
Output 1 shows a load average of 8.71, 8.24, 7.71. In a system with 4 CPUs (as indicated in Output 2), a load average above 4.00 means the CPU is fully saturated and processes are actively queuing for execution time. A load of 8.71 means the system is over-capacity by more than 100%.

CPU Utilization Details:
Output 2 shows the CPU breakdown:

%usr (User): 65.88 – More than half of the processing power is being consumed by user-level applications.
%sys (System): 20.54 – A significant portion is consumed by the kernel.
%idle: 0 – The CPU has zero downtime; it is working at 100% capacity.

Result:
When the %idle reaches 0 and the load average exceeds the core count, simple commands become sluggish because they must wait in a long queue for CPU cycles.

Explanation of Incorrect Answers
High latency:
While the user experience feels latent, "latency" in a Linux exam context usually refers specifically to network delay (ICMP/ping times) or disk response times. The primary issue here is local processing resource exhaustion.

High uptime:
Output 1 shows the system has been up for 235 days. While this is a long time, high uptime does not inherently cause a system to be unresponsive unless it has led to an unpatched memory leak or log file bloat, which is not evidenced here.

High I/O wait times:
Output 2 shows an %iowait of 5.65. While there is some disk/network waiting occurring, it is relatively low compared to the 65.88% user load. If I/O wait were the primary cause of unresponsiveness, that number would typically be much higher (e.g., >30%) while the CPU remained mostly idle.

Reference
CompTIA Exam Objective: Domain 5.0 (Troubleshooting) – Subsection 5.1: "Analyze and troubleshoot system-related issues" (specifically focusing on Performance and Process Monitoring).
Reference: Linux Man Pages (man uptime, man sar); Official CompTIA Linux+ Study Guide, Chapter on Performance Monitoring.

Which of the following can reduce the attack surface area in relation to Linux hardening?

A. Customizing the log-in banner

B. Reducing the number of directories created

C. Extending the SSH startup timeout period

D. Enforcing password strength and complexity

D.   Enforcing password strength and complexity

Explanation:

Attack surface reduction is the practice of minimizing the number of entry points (vulnerabilities and potential vectors) that an attacker can exploit to gain unauthorized access to a system. Enforcing password strength and complexity is a fundamental hardening technique that reduces this surface by making it exponentially more difficult for unauthorized users to gain entry through common methods like brute-force, dictionary attacks, or credential stuffing. By requiring unique, hard-to-guess credentials, you effectively "close off" weak authentication as a viable attack vector.

Why other options are incorrect
Customizing the log-in banner:
While useful for legal warnings or informing users that activity is monitored, a banner itself does not reduce the functional attack surface. In some cases, if a banner displays too much system information (like OS version), it could actually increase the risk by providing useful intelligence to an attacker.

Reducing the number of directories created:
The sheer number of directories does not inherently define the attack surface. Security risks are typically tied to file permissions, running services, and installed software packages. A system with many well-secured directories is often safer than a system with a few poorly secured ones.

Extending the SSH startup timeout period:
This can actually increase the attack surface or risk. A longer timeout period can leave a connection attempt open for more time, potentially making the system more vulnerable to certain types of resource-exhaustion or Denial-of-Service (DoS) attacks. Hardening usually involves shortening idle or login timeouts to minimize exposure.

Which of the following describes how a user's public key is used during SSH authentication?

A. The user's public key is used to hash the password during SSH authentication.

B. The user's public key is verified against a list of authorized keys. If it is found, the user is allowed to log in.

C. The user's public key is used instead of a password to allow server access.

D. The user's public key is used to encrypt the communication between the client and the server.

B.   The user's public key is verified against a list of authorized keys. If it is found, the user is allowed to log in.

Explanation:

During SSH public-key authentication, the process works like this:

- The client connects to the SSH server.
- The client tells the server which public key it wants to use.
- The server checks the user’s: ~/.ssh/authorized_keys

If the public key exists there:
- The server sends a challenge.
- The client proves it owns the matching private key.
- Access is granted.

👉 The server does not trust the key blindly — it verifies the public key against authorized keys first.

❌ Why the Other Options Are Incorrect
Public key hashes the password: Password authentication and key authentication are separate methods. No password hashing occurs here.

Public key is used instead of a password: Partially true but incomplete and technically inaccurate. Authentication actually relies on public key verification + private key proof, not simply replacing a password.

Public key encrypts communication: SSH session encryption uses negotiated session keys. Public keys are primarily used for authentication, not ongoing traffic encryption.

🧠 Linux Exam Tip
Remember SSH key roles:

Key Purpose
Public key Stored on server (authorized_keys) ✅
Private key Kept by user, proves identity
Session keys Encrypt SSH traffic

💡 Exam shortcut:
If question mentions authentication, think authorized_keys verification.

An administrator added a new disk to expand the current storage. Which of the following commands should the administrator run first to add the new disk to the LVM?

A. vgextend

B. lvextend

C. pvcreate

D. pvresize

C.   pvcreate

Explanation:

When adding a new disk to expand LVM storage, the very first step is to initialize the disk as a Physical Volume (PV) using the pvcreate command. This prepares the disk for use in LVM by writing LVM metadata to it.

The LVM Storage Workflow:
When adding new storage to LVM, you must follow this specific order:
Step 1: pvcreate → Step 2: vgextend → Step 3: lvextend
(Initialize disk) (Add PV to VG) (Extend logical volume)

Why pvcreate must come first:
- pvcreate initializes the new disk with LVM metadata
- Writes LVM headers to the disk
- Divides the disk into physical extents
- Makes the disk recognizable as an LVM physical volume
Only after pvcreate can the disk be added to a volume group with vgextend
Finally, you can extend logical volumes with lvextend to use the new space

Example workflow:
# 1. Identify the new disk
lsblk
# Output shows /dev/sdb is the new unpartitioned disk

# 2. Initialize as physical volume (FIRST STEP)
sudo pvcreate /dev/sdb

# 3. Verify it's created
sudo pvs
# or
sudo pvdisplay

# 4. Add to existing volume group
sudo vgextend my_volume_group /dev/sdb

# 5. Extend logical volume
sudo lvextend -L +10G /dev/my_volume_group/my_logical_volume

# 6. Resize filesystem (if needed)
sudo resize2fs /dev/my_volume_group/my_logical_volume
# or for XFS:
sudo xfs_growfs /mount/point

Why other options are incorrect:
vgextend: This command adds a physical volume to a volume group. Cannot be used first because it requires an existing PV. Would fail with error: "Device /dev/sdb not found (or ignored by filtering)". Only valid AFTER pvcreate.

lvextend: This command expands a logical volume. Requires free space in the volume group. Cannot be used first because the disk isn't even in LVM yet. Would fail: "Insufficient free space" (the new disk isn't available to LV).

pvresize: This command resizes an existing physical volume. Used when you've expanded the underlying disk (virtual disk resize). Not for adding new disks. Would fail on a new disk: "Device /dev/sdb not found in LVM".

Complete LVM Disk Addition Process:
# Step 0: Verify new disk is detected
fdisk -l /dev/sdb
# or
lsblk

# Step 1: Create partition (optional but recommended)
fdisk /dev/sdb
# Create a single partition /dev/sdb1 with type 8e (Linux LVM)

# Step 2: Initialize as physical volume
pvcreate /dev/sdb1

# Step 3: Add to volume group
vgextend my_vg /dev/sdb1

# Step 4: Extend logical volume
lvextend -L +20G /dev/my_vg/my_lv

# Step 5: Resize filesystem
resize2fs /dev/my_vg/my_lv

LVM Command Summary:
Command Purpose When Used
pvcreate Initialize disk for LVM First step with new disk
pvdisplay Show PV details Verification
vgextend Add PV to volume group After pvcreate
lvextend Grow logical volume After adding space to VG
pvresize Resize existing PV After underlying disk grew

Reference:
LVM = Logical Volume Manager
PV = Physical Volume (disk or partition)
VG = Volume Group (pool of storage)
LV = Logical Volume (virtual partition)
The order is critical: PV → VG → LV
Skipping pvcreate is like trying to pour water into a bottle that doesn't exist yet

Which of the following commands should an administrator use to convert a KVM disk file to a different format?

A. qemu-kvm

B. qemu-ng

C. qemu-io

D. qemu-img

D.   qemu-img

Explanation:

The qemu-img command is the standard QEMU/KVM utility used to create, convert, modify, and inspect virtual disk images.

Administrators commonly use it to convert disk images between formats such as:
- qcow2 (QEMU Copy-On-Write)
- raw
- vmdk (VMware)
- vdi (VirtualBox)
- vhd/vpc

Example conversion:
qemu-img convert -f qcow2 -O raw disk.qcow2 disk.raw

-f → source format
-O → output format

This is exactly the tool required when working with KVM virtual machine storage.

❌ Why the Other Options Are Incorrect
qemu-kvm:
Used to run virtual machines using KVM acceleration. It launches VMs but does not manage or convert disk images.

qemu-ng:
Not a valid standard QEMU command. Likely a distractor option.

qemu-io:
Used for low-level disk I/O testing and debugging. Helpful for performance testing or examining image behavior. Not intended for format conversion.

🧠 Linux+ Exam Tip
For CompTIA Linux+:
VM disk management → think qemu-img
Running VMs → qemu-system-* / qemu-kvm
Storage conversion tasks almost always map to qemu-img.

Following the completion of monthly server patching, a Linux administrator receives reports that a critical application is not functioning. Which of the following commands should help the administrator determine which packages were installed?

A. dnf history

B. dnf list

C. dnf info

D. dnf search

A.   dnf history

Explanation:

The dnf history command allows an administrator to view a timeline of all transactions performed by the DNF package manager. In a troubleshooting scenario following a system update or patching, this command is critical because it:
- Lists the specific transaction IDs, dates, and times of recent changes.
- Shows exactly which packages were installed, upgraded, or removed during the monthly patching session.
- Provides the ability to use dnf history info <ID> to see a detailed list of every package altered in a specific transaction.
- Offers a path to recovery via dnf history undo or dnf history rollback if a specific update is identified as the cause of the application failure.

Why other options are incorrect
dnf list: While this command can list installed packages (using dnf list installed), it shows the current state of the entire system rather than a chronological history of what was changed during the patching window.

dnf info: This command provides metadata (version, release, description, license) for a specific package but does not track when it was installed or what other packages were part of a recent update transaction.

dnf search: This is used to find packages in the repositories that match a specific keyword. It is a pre-installation tool and does not provide information about the system's update history.

Page 4 out of 15 Pages